Track Mania Scripting How-To
Recently, I was sent a link to an outstanding YouTube video about someone who trained an AI to outpace them in a racing game. My curiosity was immediately piqued, and I began to wonder if this could serve as a viable platform for prototyping my AI racing driver algorithms. In this post, I’ll provide a concise guide on setting up TrackMania with a script, focusing on the one detailed in the video: Training an unbeatable AI in TrackMania
Track Mania Nations Forever Installation
From my research, TrackMania’s legacy goes back almost 20 years, to 2003. We will be using the completely free version titled “TrackMania Nations Forever.” While this version has its constraints, it’s ideal for our needs. To delve deeper into the game’s history, consult this informative Wikipedia article: Track Mania
The game can be downloaded from: Track Mania Nations Forever.
The installation process is straightforward, and unless necessary, I’d suggest sticking with the default settings in the installer.
TMUnlimiter
Introduced in 2010, TMUnlimiter added innovative features to the track editor, such as the ability to create oversized maps. If you’re keen on experiencing the three levels showcased in the aforementioned video, you’ll need to install TMUnlimiter along with TrackMania and another tool known as TMInterface by Donadigo.
Download TMUnlimiter from this link: TMUnlimiter Download.
Post extraction, there’s a readme that guides you through the installation.
It’s worth noting that TMUnlimiter necessitates the x86 version of the 2010 C++ redistributable package. If you encounter an error stating it can’t find “MSVCR100.dll”, it means you may have the x64 version and will need to procure the x86 version from Microsoft’s site: Microsoft Visual C++ 2010 Redistributable Package Service Pack 1
Donadigo TMInterface
Next, we have TMInterface, a TAS (Tool Assisted Speedrun) tool for TrackMania. Essentially, it allows users to script everything from car controls to UI enhancements. For a more satirical take, you can check this video: [Warning Satire] [TUTORIAL] How to make TAS (Tool-Assisted Speedruns) in Track Mania
Downloaded from this link: Donadigo’s TMInterface website.
Follow the installation instructions on the website, taking note that the process slightly differs for Steam installations compared to standalone ones.
Running TMInterface alongside TMUnlimiter
Figuring out how to operate TMInterface in tandem with TMUnlimiter took a bit, but I chanced upon a tip on TMInterface website.
Start TMInterface (execute TMInterface.exe) to launch TrackMania Nations Forever. Before selecting your driver profile, input “load_infinity” in the TMInterface console. Afterward, you can pick your driver profile and access both TMInterface and TMUnlimiter.
Sai-Moen Wallhugger Install
Upon setting up the above, I sought ways to exploit the API for vehicle control beyond the scripting facilitated by TMInterface. In my quest, I discovered a YouTube video demonstrating a wallhugger script. Sai-Moen’s GitHub page has the Angel Script version, a direct adaptation from his original Python Wallhugger script, which is no longer supported or maintained (in the latest version of TMInterface).
To install the Angel Scripts, download a copy of Sai-Moen’s TMInterface-AS module (click on Code -> Download ZIP), which contains a module as well as some other standalone scripts. There are instructions in the README.md but when I did this it was simply a case of copying the Incremental folder and the individual .as script files to the following location: C:\Users\<username>\OneDrive\Documents\TMInterface\Plugins. Substitute your username as appropriate and if you don’t use OneDrive just find your Documents folder. Basically you’ll need to hunt down where your TMInterface\Plugins folder lives.
Running the Wallhugger Bruteforce
To execute a Bruteforce run, complete a run on the track and save a replay (alternatively you can download a replay from the internet).
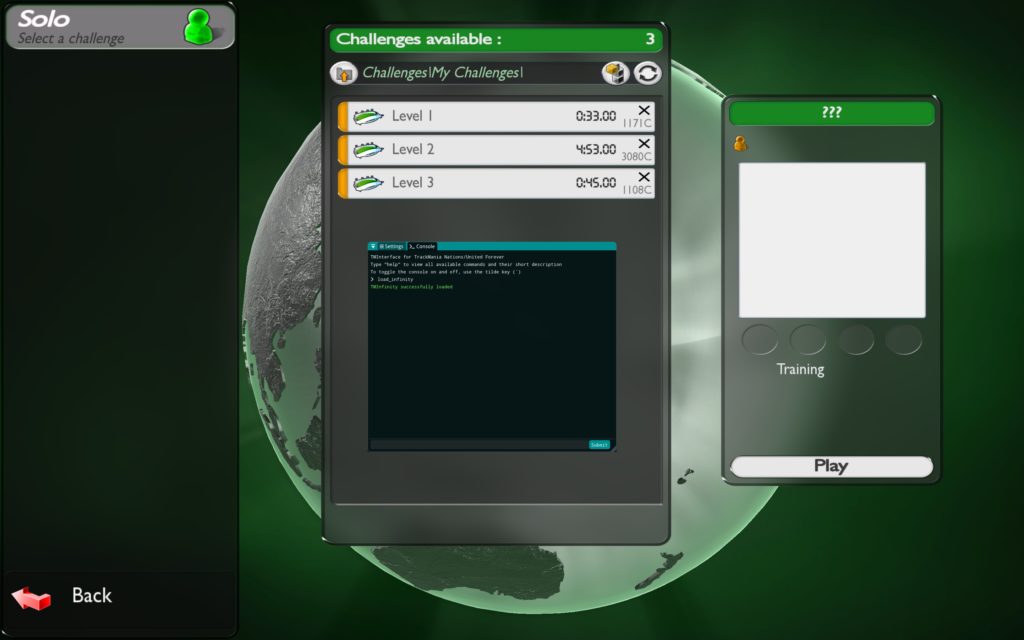
Example: To save a replay of one of the levels seen in the video, make sure they are installed in the correct location and then:
- From the main menu
- Play Solo
- Browse
- Challenges
- My Challenges (assuming this is where you installed them)
- Level 1 (or whichever you want)
- Play
- [Execute a run on the keyboard]
- Save Replay
Next, from the TMInterface console, go to the Settings tab and down to the Plugins section. You can disable everything except for the “Incremental Module”.
Still in the settings, find the Bruteforce section and select SaiMoen’s Incremental module. Check a few of the settings here including “Maximum evaluation time”. Expand the modes section and make sure wallhugger is selected. Change the other settings as appropriate.
Finally run the bruteforce by:
- From the main menu
- Editors
- Edit a Replay
- Select the replay you want to bruteforce
- Launch
- Sai Moen’s Incremental module
If everything is installed and running correctly, a new console window appears and it will start streaming. This will continue until one of three things happen:
- The finish line is reached
- The Maximum evaluation time is reached
- You hit escape
If a faster time is found, you should have a results.txt to load back into the console (“load results.txt”). Now when you attempt to drive the track again, you will see the bot drive 🙂 Happy TM’ing!